Cirrusly Commerce User Guide
Updated: December 23, 2025

We're currently working on our comprehensive documentation to help you get the most out of Cirrusly Commerce. Stay tuned for updates!
For the latest changes and updates, please visit the Changelog.
Why did a weather station retailer develop a WooCommerce plugin? Our reasons were many, but the most important were these:
- We were struggling with Google Merchant Center policies and functionality, resulting in disapprovals, an unexplained misrepresentation suspension, and significant frustration.
- Google suspensions are intentionally vague to deter fraudulent activity, but they can sometimes leave legitimate online stores without a key marketing channel because identifying those issues can be complex.
- Our margins were just not where they needed to be, and we were often selling products far too close to cost (or even slightly below, ouch) because we weren’t accounting for fees and shipping.
- The WooCommerce plugin landscape seems more apt to rip you off for one or two good features, requiring five or six plugins that could be handled in a single, performant plugin.
- Most small e-commerce businesses can’t afford these plugins, leaving them without Google Merchant Center functionality and pricing strategy tweaks that could increase their profit margins and make compliance with Google policies much easier.
What is Cirrusly Commerce?
Cirrusly Commerce is an all-in-one suite designed to optimize your WooCommerce store’s financial health and Google Merchant Center compliance. This plugin optimizes several parts of WooCommerce for use with Google Merchant Center functionality, including:
- Adding two fields to the General tab of individual product pages when editing: MSRP and MAP (Minimum Advertised Price). The MSRP can be displayed on the front end, allowing you to use the regular and sale price fields as intended (rather than always showing items under MSRP on purchase, which can trigger flags in Google Merchant Center). MAP can help ensure you’re not selling below the manufacturer’s minimum advertised price (MAP) and can take advantage of Google’s Pricing Suggestions feature. If you’re not interested in that, Google will use the data to show suggested sale prices for increased conversions.
- Mapping the fields provided by our plugin using a product feed plugin (we use and recommend Product Feed Pro). This data will not be in your feed data by default.
- Calculating margins. However, instead of a simple selling price minus cost calculation, Cirrusly Commerce can also calculate if what you’re charging for shipping equals the actual cost to ship. At this time, this only supports shipping costs by price tiers. You can manually enter a shipping cost for each product, or by shipping class if you use Octolize’s Flexible Shipping plugin.
- Adding a pricing ‘engine’ to the product tab. This allows you to easily see how various pricing strategies affect your margins, including expedited shipping.
- Enabling features formerly available only in high-cost Google Merchant Center plugins, including Google Customer Reviews, pricing suggestions, Automated Discounts, and the ability to upload promotion data from external sources.
- It includes countdown and badging logic, so you don’t need a second plugin for a single task.
- It scans your site for common trigger words that can lead to Google Merchant Center suspensions and checks for required legal and compliance documents (privacy policy, terms of service, etc.).
- It includes AI and on-server-assisted image manipulation to address image quality issues.
- Over the next several months, we will be incorporating new functionality enabled by Google APIs. Our image generation functionality is the beginning. 🙂
You can choose which functionality you’d like to enable. For example, if you are using another MSRP plugin (such as WPFactory’s), you can disable that functionality in our plugin to prevent conflicts. We’ve also ensured there are ample ways to filter and search your data in a way that works for you.
Free vs Pro vs Pro Plus
Cirrusly Commerce is available in three tiers: Free, Pro, and Pro Plus. Although not a perfect categorization, automation is the key differentiator. All primary modules are available to all users, except Analytics, which is exclusive to Pro Plus plans.
You do not need a subscription to use our plugin. Only Premium features require a subscription. Pro and Pro Plus both offer free trials (no credit card required). Trial lengths are displayed during upgrade and may vary by plan. You do not need a credit card to start your trial; however, you must subscribe before the end of your trial to keep features active.
The table below summarizes the differences between the Free, Pro, and Pro Plus tiers.
| Feature | Free | PRO | PRO+ |
|---|---|---|---|
| Core Modules (Dashboard, Profit Engine, Compliance Hub, Financial Audit) | ✅ | ✅ | ✅ |
| Badge Manager | ✅ | ✅ | ✅ |
| Pricing Intelligence | ✅ | ✅ | ✅ |
| AI Image Enhancement | ❌ | ✅ | ✅ |
| AI Text Enhancement | ❌ | ❌ | ✅ |
| Automation Features (e.g., Auto Badge Application) | ❌ | ✅ | ✅ |
| Analytics Module | ❌ | ❌ | ✅ |
How Much Cirrusly Commerce Can Save You
Inflation has also hit WordPress and WooCommerce plugins in particular. Part of our reasoning for building this plugin was to combat the bloat and high cost of plugins that do only one thing. The average user would save $50-$100 per year on plugin costs and eliminate at least two plugins, if not more.
It has been tested alongside and is known to be compatible (or hardcoded to support) the following WooCommerce plugins:
- Product Feed PRO (AdTribes)
- Google Product Feed (Ademti)
- SEO plugins such as Rank Math SEO, Yoast SEO, All in One SEO (AIOSEO), & SEOPress (Schema Injection included)
- WooCommerce Cost of Goods (SkyVerge) & MSRP (WPFactory)
- Octolize Flexible Shipping (for base shipping costs)
If you have other plugins installed, we can’t guarantee complete support or compatibility. However, as long as they aren’t moving data to or reading from a different database (ATUM or others), there shouldn’t be any issues.
Please reach out to us if you have any questions or any problems. (We’d also be interested in hearing about compatible and incompatible plugins so that we can update the above list for future readers.)
While we can’t save you from data entry, you’ll have a much clearer picture of your site’s profitability in less than a day and be free of the common pitfalls that trip up small e-commerce sites using Google Shopping for promotion.
We cannot guarantee that you will avoid or remedy disapprovals/suspensions in Google Merchant Center with this plugin. However, using this plugin will help quickly eliminate the most common issues before your own intensive manual review. NEVER appeal without checking your site for all issues that may cause suspensions: should reviewers find new problems, the suspension remains, and the three-strike (two appeals before final decision) rule doesn’t reset, and now you have two issues to find and fix!
Installation
Before installing or using Cirrusly Commerce, you must make a minor change to your WooCommerce settings to ensure the plugin works correctly. Beginning with WooCommerce 9.9, a native cost of goods sold (COGS) field was added, but it is not enabled by default.
Cirrusly Commerce uses this field in its calculations rather than creating a separate database entry. This way, should you decide to use another plugin, you will not lose your data.
Cirrusly Commerce uses this native field for profit calculations. If this is disabled, the Pricing Intelligence features will not function, but other plugin features will work normally. To enable, navigate to WooCommerce > Settings > Advanced, and check the box beside Allows entering cost of goods sold information for products (about halfway down). Save the changes, and the COGS field should appear.
Installing Cirrusly Commerce is no different from installing any other WordPress or WooCommerce plugin. You can download the plugin directly from this link; however, the easiest method is to search for “Cirrusly Commerce” in the WordPress Plugin Directory, then download, install, and activate it.
Before You Start
Because Cirrusly Commerce requires significant initial configuration to get the most out of the plugin, new installs will start with our Setup Wizard. While you can skip this step and proceed to the plugin, we strongly recommend using the setup wizard instead.
Note: When we push major new releases with new functionality, you will be automatically notified to rerun the setup wizard to configure these new features.
To speed up the process, have the following handy or open the following webpages as you’ll need them later:
✅ Your Cirrusly Commerce API Key
✅ If you’re signing up for Pro or Pro Plus, a Google Cloud Console account with an active billing account (open https://cloud.google.com)
✅ Information on your credit card processing fees and shipping costs
The Setup Wizard will ask for this data. Since API connectivity is the most complex and time-consuming portion of the process (and the most complicated), we recommend having everything else ready so the plugin is functional while performing any necessary API connectivity debugging.
We’ve reviewed the directions below for accuracy, but Google does frequently change the process. Please reach out for assistance if you need it!
Configuration
The setup wizard will guide you through the initial configuration of Cirrusly Commerce, ensuring that all necessary settings are properly configured for optimal performance. There are four primary steps.
License

The first screen lets you choose among the following plans: Starter, Pro, and Pro Plus.
After choosing your plan, refresh the page by clicking I've already started my trial (Refresh) at the bottom of the page. This ensures the wizard shows you the correct next steps for setup, which vary based on plan level.
Connect
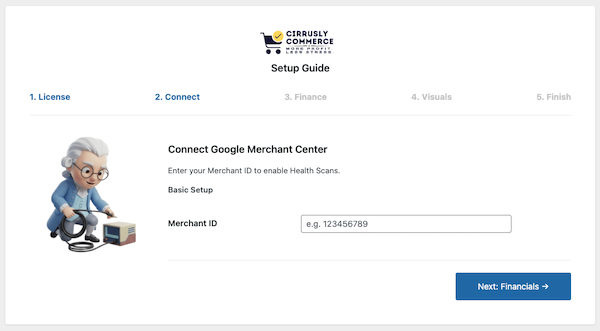
Cirrusly Commerce connects with your Google Merchant Center account to enable advanced functionality. You will need your Merchant ID from Google Merchant Center. To find it: click the gear icon (⚙️) in GMC, select Account Settings, and look for the Merchant ID at the top of the page.
If you're a free user, you can proceed to the next section as no further setup is required for your plan.
While the plugin asks for your Merchant Center ID here, it is stored within your database and not shared with us. Copy this correctly - it's required for all Google Merchant Center integrations, including health scans, API sync, analytics, and customer reviews!
Pro and Pro Plus users will see an additional field labeled Service Account JSON. To enable Real-Time API Sync in Cirrusly Commerce Pro and Pro Plus, you must authenticate your store with Google using a Service Account Key. This secure key allows your store to communicate directly with Google APIs. Below is the step-by-step guide to generating and uploading this key.
Step 1: Create a Project in Google Cloud
Log in to the Google Cloud Console.
Click the project dropdown in the top navigation bar.
Click New Project.
Name your project (e.g., Cirrusly Commerce Sync) and click Create.
Once created, select your new project from the dropdown menu.
Step 2: Enable the Content API
In the search bar at the top of the Cloud Console, type Content API for Shopping and select it.
Click Enable to turn on the API for this project.
Step 3: Create the Service Account
Navigate to IAM & Admin > Service Accounts in the left-hand menu.
Click + Create Service Account at the top.
Service account details:
- Name: Enter a name (e.g., feed-sync-user).
- Description: (Optional) For Cirrusly Commerce API Sync.
- Click Create and Continue.
Grant this service account access to the project:
- Click the Select a role dropdown.
- Search for and select Content API Editor (or Editor if you cannot find the specific role).
- Click Continue and then Done.
Step 4: Generate the JSON Key
You will now see your new service account in the list. Click on the Email address of the service account you just created.
Click the Keys tab at the top.
Click Key > Create new key.
Select JSON as the key type.
Click Create.
A .json file will automatically download to your computer. Keep this file safe—you cannot download it again.
Once you have your JSON file, upload it to this step, and your functionality will be ready to go.
If the upload succeeds, the filename will appear in the upload field. Your store is now ready to push real-time updates to Google Merchant Center!
Product Studio Setup (Pro Plus)
Product Studio requires additional Google Cloud configuration beyond basic GMC integration. Follow these steps carefully.
Prerequisites
- Pro Plus Subscription - Product Studio is only available on the Pro Plus tier
- Google Cloud Project - Same project used for your service account
- Billing Enabled - Google charges for AI API usage (you pay Google directly, not us)
Step 1: Enable Required APIs
In your Google Cloud Console, enable these APIs:
- Content API for Shopping (already enabled for basic GMC features)
- Cloud Natural Language API - For text generation (descriptions, titles)
- Cloud Vision API - For image analysis and background detection
- Vertex AI API - For image generation and enhancement
Step 2: Configure Service Account IAM Roles
Your service account needs TWO specific roles:
- Go to IAM & Admin > IAM in Google Cloud Console
- Find your service account email (e.g.,
my-service-account@project-id.iam.gserviceaccount.com) - Click the pencil icon to edit permissions
- Add these roles:
- Content API Editor (roles/content.admin)
- AI Platform User (roles/aiplatform.user)
- Save changes
Step 3: Link Merchant Center to Cloud Project
This is the most commonly missed step! Your Merchant Center account must be linked to the same Cloud Project as your service account.
- Open Google Merchant Center
- Go to Settings > Account Settings
- Find the "Google Cloud Project" section
- Click "Link Project"
- Enter your project ID (found in service account JSON file:
"project_id": "your-project-123456") - Click Link
Step 4: Validate Setup in WordPress
Cirrusly Commerce includes a built-in validation system in the Setup Wizard (Step 2):
- Navigate to Cirrusly Commerce > Setup Wizard
- Go to Step 2: Connect
- Scroll to the "Product Studio Setup" section (collapsible accordion)
- Click each validation button:
- Test 1: API Access - Verifies APIs are enabled
- Test 2: IAM Permissions - Confirms service account roles
- Test 3: Merchant Linkage - Checks GMC/Cloud Project connection
- All three tests should show green checkmarks (✓)
Status Indicators:
- ✓ Valid - Test passed, feature ready to use
- — Not tested - Click the test button
- ✗ Failed - Click the help icon (?) for troubleshooting steps
Product Studio uses YOUR Google Cloud account, so API costs are billed directly to you by Google (not by us).
Why don't we front these costs?
- If we absorbed API costs, we'd need to charge 10× more for subscriptions
- Or impose strict usage limits (e.g., 10 images/month)
- With 1,000 users generating 100 images each = $2,000/month, we'd absorb
The good news: We designed most features to be FREE or very low-cost (see image enhancement cost tiers below).
Finance
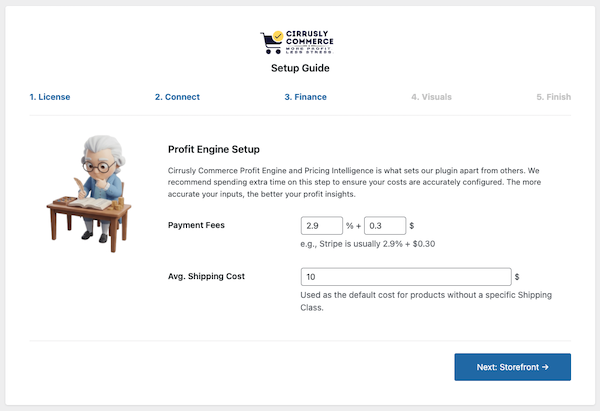
The Finance tab in the Setup Wizard lets you enter your typical payment processing fees (e.g., Stripe charges 2.9% + 30 cents in the US at the time of the writing of this documentation) and your typical internal cost to ship a product (not what you charge customers, but what you actually pay for shipping). If costs vary by product, enter a weighted average. This is used to calculate profit margins in the Pricing Intelligence and Financial Audit modules.
If you want more accurate fee data, Pro and Pro Plus users can specify multiple payment gateways and an average split among them. This can be especially helpful for stores that use Buy Now Pay Later (BNPL), which charge significantly higher fees.
Visuals
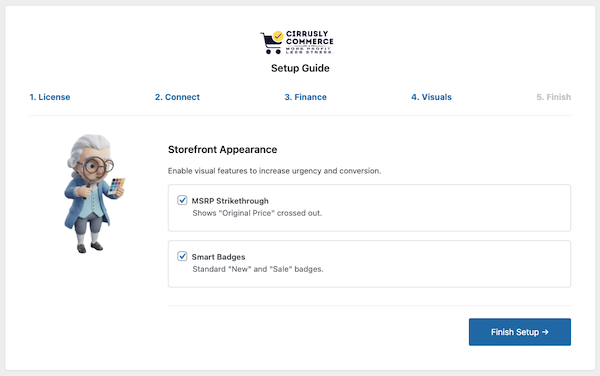
As we noted earlier, Cirrusly Commerce enables a new MSRP field for you to use. You can choose to display these prices on product pages and shop grids by checking MSRP Strikethrough.
Cirrusly Commerce also supports basic badging in the free addition. Sale badging will show the percentage discount (including “up to” when the discount varies for variable products), and a “new” badge for products added within the last 30 days (customizable).
Pro and Pro Plus users can optionally enable “low stock” and “best seller” badging to create a sense of urgency among buyers for hot-selling items.
API Quota Management System
To prevent unexpected Google Cloud API charges and ensure fair usage, Cirrusly Commerce includes a sophisticated quota tracking system with real-time visual feedback.
Quota Limits by Tier
| Subscription Tier | Daily API Call Limit | Typical Usage |
|---|---|---|
| Free | 50 calls/day | Manual scans only (5-10 scans/day) |
| Pro | 500 calls/day | Daily automated scan + occasional manual scans |
| Pro Plus | 2,500 calls/day | Daily scan + GMC Analytics sync + AI generation + multi-store management |
You might notice that even though free accounts cannot access the API, they still have a small quota limit. This is to allow free trial users to explore the plugin's features and allow for potential future upgrades, where free accounts might gain limited API access.
Live Quota Bar

You'll see a quota usage indicator on two pages:
- Analytics Dashboard (Cirrusly Commerce > Analytics)
- GMC Compliance Hub (Cirrusly Commerce > Compliance Hub)
Quota Bar Features:
- Real-Time Updates: Refreshes every 30 seconds via AJAX (no page reload needed)
- Color-Coded Warnings:
- Green (0-50% used) - Healthy usage
- Yellow (50-80% used) - Moderate usage, monitor carefully
- Red (80-100% used) - High usage, conserve quota
- Expandable Details: Click bar to show breakdown by action type
- Auto-Expand at 80%: Details panel opens automatically when you reach the warning threshold
- Midnight Reset: Quota resets daily at 12:00 AM server time
How Quota Tracking Works
- Every API call (GMC scan, Product Studio generation, Analytics sync) is logged in the service worker database
- Daily counter stored in the
api_usage_statstable with timestamp - Quota check runs before each API call - if >95% used, call is blocked
- User notification shows: "Daily quota limit reached (X/X calls). Resets at midnight."
- Automatic retry after midnight when cron jobs run
What Counts Toward Quota?
| Action | API Calls Used | Notes |
|---|---|---|
| GMC Health Scan (Manual) | 1-5 calls | Depends on product count (batched in groups of 100) |
| GMC Health Scan (Automated Daily) | 1-5 calls | Same as manual, runs at 2 am |
| Product Studio - Generate Description | 1 call | Per product |
| Product Studio - Optimize Title | 1 call | Per product |
| Product Studio - Enhance Alt Text | 1 call | Per product (all images at once) |
| Product Studio - Image Enhancement | 1-2 calls | Vision API + Imagen (free modes use zero calls) |
| GMC Analytics Initial Import | ~18 calls | 9 batches × 2 calls each (products + pricing data) |
| GMC Analytics Daily Sync | 2-4 calls | Updates yesterday's data only |
| Automated Discounts Sync (Pro Plus) | 1-2 calls | Per product being promoted |
Best Practices for Quota Conservation
- Use FREE Product Studio features first - Blur, color, and gradient backgrounds use 0 API calls.
- Batch GMC scans - Scan once daily instead of after every product edit
- Optimize AI generation - Preview and edit before regenerating (each regeneration = 1 call)
- Schedule imports - Run GMC Analytics import during off-hours (automated at 2 am)
- Monitor the quota bar - Check before starting bulk operations
What happens when I am close to exhausting my quota?
When you reach 95% of your daily quota:
- API calls are blocked to prevent overages
- Red admin notice appears: "Daily API quota limit reached (X/2500 calls used). Quota resets at midnight."
- Automated tasks are queued and will retry after midnight
- Manual actions show error: "Cannot complete action - daily quota exceeded. Please try again tomorrow."
Need More Quota?
Upgrade to Pro Plus: If you're consistently hitting quota limits on the Pro tier, upgrading to Pro Plus gives you 5× more quota (2,500/day) plus additional features like GMC Analytics and AI enhancements.
Enterprise Needs: Managing multiple stores or need custom quota limits? Contact support for agency/enterprise pricing. Custom quota limits are only available through enterprise plans.
Note: Quota tracking is separate from Google Cloud billing. These limits prevent excessive API calls; you still pay Google for actual API usage under their pricing model.
Once you’re done with configuration, click “Complete Setup.” You’re ready to enjoy all our plugin has to offer!
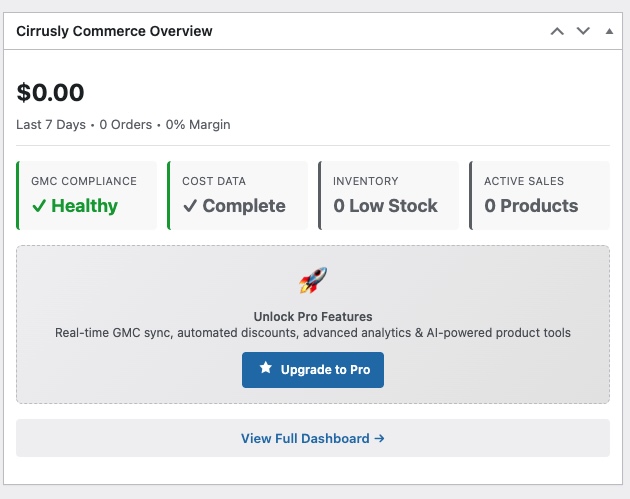
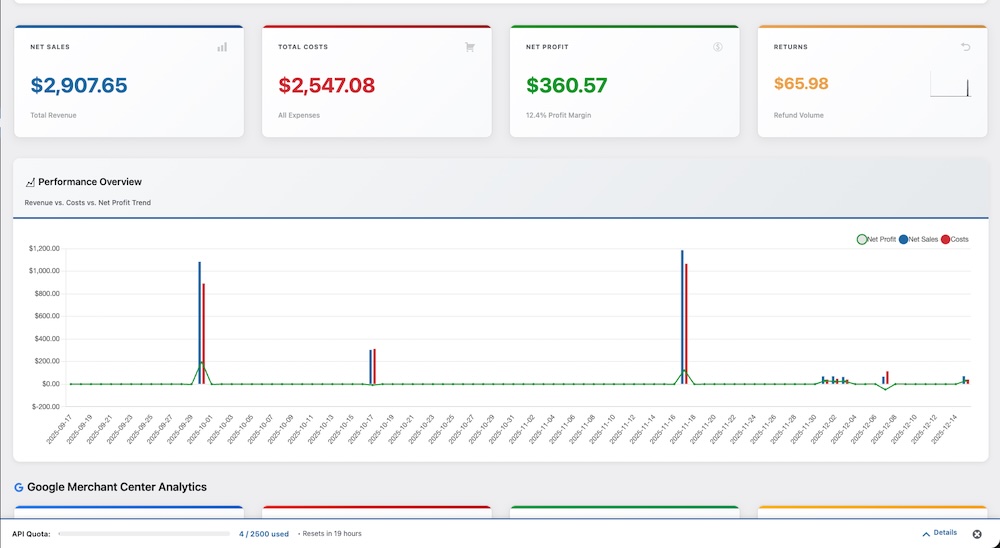
The Dashboard

The dashboard is your command center for monitoring your store's financial health and Google Merchant Center compliance. It provides an immediate snapshot of your performance without digging into complex reports.
To access it, navigate to Cirrusly Commerce > Dashboard.
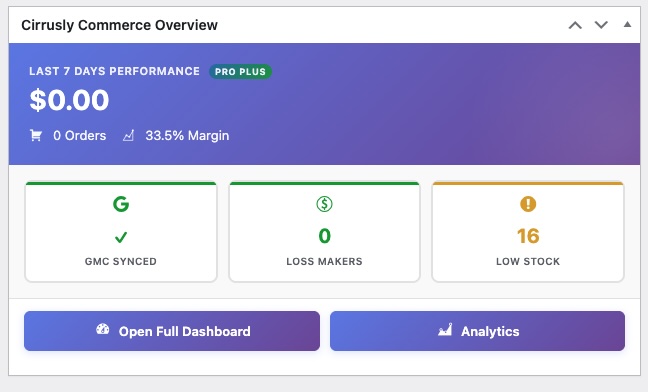
Store Pulse (Last 7 Days)
At the very top, you’ll see the Store Pulse bar. This gives you a quick view of your recent performance, showing your total revenue and order count for the past week.
Dashboard Cards
Below the pulse, your store data is organized into four actionable cards:
- Catalog Snapshot: A quick inventory overview showing your total product count, how many items are currently on sale, and a "Low Stock" alert (highlighted in orange) if inventory runs low.
- Profit Engine: Monitors your profitability.
- Avg Margin (Est): The average profit margin across your store based on your entered COGS.
- Unprofitable Products: Alerts you to "Loss Makers"—products currently being sold at a net loss.
- Missing Cost Data: Flags products that don’t have a Cost of Goods Sold entered, which affects your reporting accuracy.
- Critical Issues: Displays red alerts for errors that can lead to account suspension (e.g., missing GTINs).
- Warnings: Highlights non-critical issues that might limit ad performance.
- Content Policy: Checks your site content for prohibited terms.
- Sync Status (Pro): Displays whether the Real-Time API connection is active.
Quick Links: Provides shortcuts to frequently used tools, including Promotions Manager, Plugin Settings, and the User Manual. Please note that the in-plugin manual does not include all documentation.
The WordPress Dashboard Widget
You don’t even need to enter the plugin to check your status. Cirrusly Commerce adds a widget to your main WordPress Dashboard.
This mini-widget displays your 7-day revenue, average margin, and three critical "Red Flag" counters:
- Critical errors: Loss Makers: Products with negative profit.
- Loss Makers: Products with negative profit.
- No Cost: Products missing COGS data.
Pro and Pro Plus users get an enhanced widget with additional GMC compliance data and analytics integration:
The Profit Engine
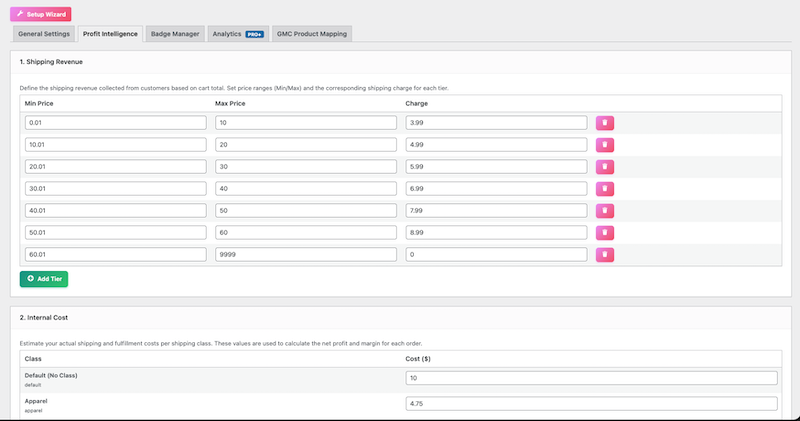
The Profit Engine lets you fine-tune your shipping costs, which is often overlooked when assessing overall expenses. You can adjust these settings by Navigating to Settings > Profit Intelligence.
Revenue Tiers: Click “Add Tier.” You must provide a minimum price, a maximum price, and a rate. For example, if orders between $0 - $10 cost the customer $3.99, enter Min: 0, Max: 10, Charge: 3.99. For free shipping, enter zero as the rate and a minimum price. The plugin will automatically set a maximum cost of 9999 (which should be more than enough, unless you’re selling very high-end items!).
Shipping Class Costs (Base Cost): Cirrusly Commerce automatically determines shipping classes for compatible plugins. Shipping classes let you enter your shipping costs, which the plugin can then use to assess profit and loss more accurately. If you use Octolize’s Flexible Shipping plugin, Cirrusly Commerce will auto-detect these classes, so you will only need to enter your costs. If you do not have this plugin installed, you will only see the default tier (we definitely recommend installing it, though!).
You are not limited to using this to determine costs; you can override each shipping cost at the product level by changing the “base ship” value on the product tab.
Payment Fees: Adjust your processing fees here.
Profitability Matrix Multipliers: While not a perfect method, if shipping rates across methods follow a general multiplier pattern (e.g., expedited is 1.5x as expensive as standard), you can add those here to make your calculations even more accurate.
Most of our Profit Engine is available to all subscription levels, including our free tier. However, if you have a Pro or Pro Plus subscription and need to adjust your processing fees or splits, you can do so here.
The Compliance Hub
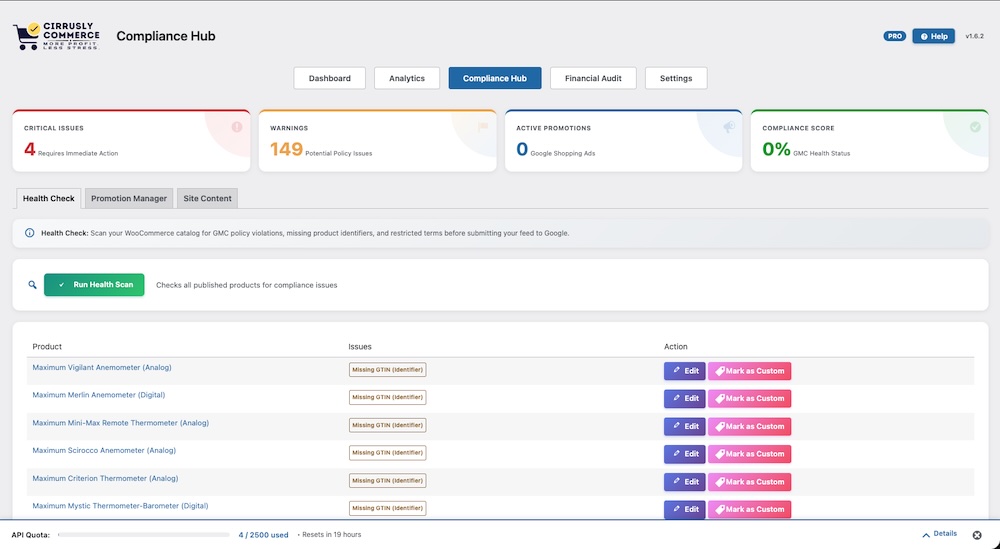
Most WooCommerce store owners use Google Merchant Center for promotion, but staying compliant is a challenge. Cirrusly Commerce simplifies compliance by identifying the most common data quality and content issues.
To access the hub, navigate to Cirrusly Commerce > Compliance Hub. The hub is divided into three tabs: Health Check, Promotion Manager, and Site Content.
Health Check
The Health Check is the primary audit tool for your product catalog. It scans for omissions, inconsistencies, and specific terms that Google may flag as disapproved.
- Running a Scan: Click the Scan for Issues button to audit your entire catalog.
- Reviewing Results: The table lists affected products with color-coded badges indicating the issue type (e.g., "Missing Image," "Restricted Term").
- Actions:
- Edit: Opens the product editor to fix the issue immediately.
- Mark as Custom: If a product is flagged for "Missing GTIN" but is a handmade or vintage item, click this to automatically tag it as a custom product (identifier_exists="no") for Google.
Automation & Workflow Rules (Pro)
Pro users can enforce compliance automatically to prevent bad data from ever reaching the feed:
- Block Save on Critical Error: Prevents you from saving or publishing a product if it contains critical errors, such as prohibited medical terms.
- Auto-strip Banned Words: Automatically removes known banned words from titles and descriptions when you save a product.
Promotion Manager
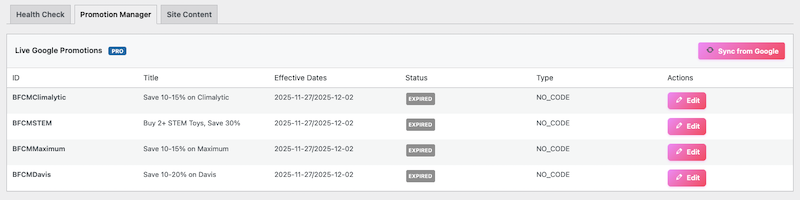
This tab helps you manage sales and special offers on Google Shopping.
Live Google Promotions (Pro)
Pro users can sync directly with Google Merchant Center to view all active promotions, their effective dates, and their real-time status (e.g., Active, Pending, Rejected). You can also use the One-Click Submit feature to push new promotions directly to Google via the API.
Promotion Feed Generator
For Free users or manual feeds, this tool generates the specific data needed for Google Sheets:
- Enter the promotion details (ID, Title, Dates, Code).
- Click Generate Code to create a snippet you can copy and paste into your feed file.
- Local Assignments: View and manage which products are assigned to specific Promotion IDs within WooCommerce. You can use the bulk tools here to move or remove promotions across product groups.
Site Content
Google reviews your entire website, not just your product feed. This tab ensures your site pages meet those standards.
- Required Policies: The plugin automatically checks for the presence of mandatory legal pages: Refund/Return Policy, Terms of Service, Contact Page, and Privacy Policy.
- Restricted Terms Scan: Click Run New Scan to search your Pages and Product Descriptions for prohibited terms (e.g., "cure," "guaranteed," "covid") that might trigger a suspension.
- Google Account Status (Pro): Pro users can view a real-time health check of their Google Merchant Center account. This card displays any account-level suspensions or policy warnings fetched directly from the API.
Understanding Your Margins: The Store Audit
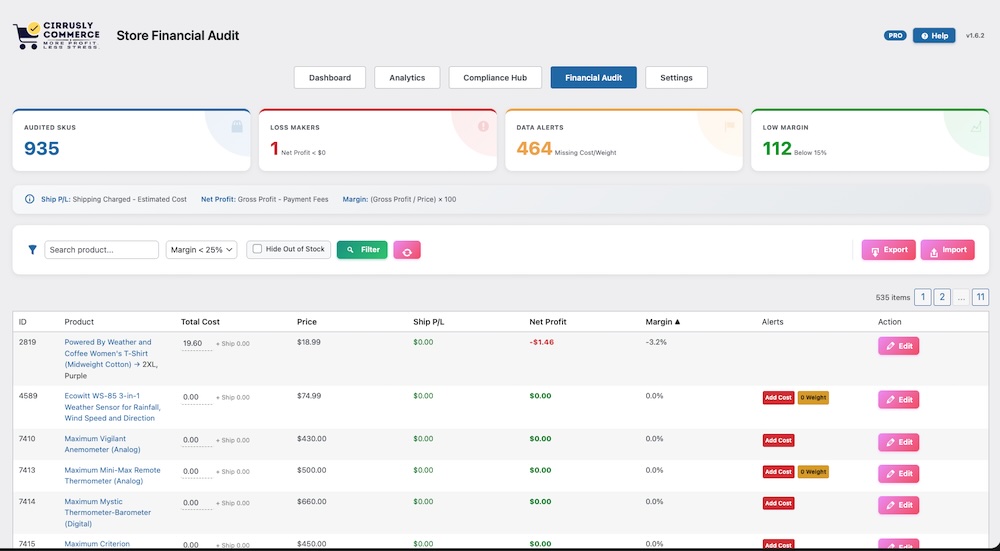
The Store Audit is a central location for understanding your store's financial health at a glance. Getting orders is only part of the game: how much you’re spending to make that sale is equally important. This tool lists all products to identify financial leaks.
To use the Store Audit, navigate to Cirrusly Commerce > Store Audit.
Each product has several columns of data for you to review:
- Total Cost: The sum of COGS and shipping costs.
- Price: The price the customer pays
- Ship P/L: Are you profiting on the product but giving it right back by shipping it to the customer? This will help you answer that question.
- Net Profit: Price - Cost - Ship P/L = Net Profit.
- Margin: In most niches, you’ll want to keep it above 15% (30% is optimal).
- Alerts: Important action items for you to address.
- Red Text: Negative profit (Net loss).
- Orange Text: Low margin (< 15%).
- "Missing Cost": Product has no COGS entered.
- "0 Weight": Product has no weight (affects shipping calculations).
Filters: Filter by Category, Margin Threshold (e.g., show all items with a margin < 25%), or hide Out-of-Stock items.
Pro Plus Analytics PRO+
This feature is currently in beta and may be subject to changes. We appreciate your feedback!
Import Google Merchant Center performance data directly into WordPress. See which products drive impressions, clicks, and conversions without leaving your dashboard.
What is GMC Analytics?
GMC Analytics is a Pro Plus feature that syncs your Google Shopping performance data into WordPress, allowing you to:
- Track Product Performance: See impressions, clicks, CTR, and conversions per product
- Identify Top Performers: Discover which products drive the most Google Shopping traffic
- Monitor Price Competitiveness: Get alerts when your prices are too high vs. competitors
- Visualize Traffic Funnels: Chart showing Impressions → Clicks → Add to Cart → Orders
- 90-Day Historical Data: Track trends over time with daily/weekly aggregated reports
✅ Service Account JSON uploaded (with Content API access)
✅ Products already submitted to Google Merchant Center (via feed or Content API)
Initial Setup: Importing Historical Data
The first time you enable GMC Analytics, you must run an initial import to pull historical performance data. This is a one-time process.
Step 1: Navigate to the Analytics Page
Go to Cirrusly Commerce > Analytics
At the top of the page, you'll see a blue banner:
Import Google Shopping performance data to see which products drive traffic and conversions.
[Start Import]
Step 2: Run Initial Import
Click the Start Import button
A progress bar appears showing batch progress (e.g., Importing batch 3 of 9...)
Import runs in 9 batches (200 products per batch, ~18 API calls total)
Process takes 2-5 minutes, depending on catalog size
When complete:
Email sent to admin address: "GMC Analytics import complete! X products mapped."
Page automatically reloads
Blue banner disappears
Analytics widgets now show data
Step 3: Product Mapping
GMC Analytics must map Google Shopping product IDs to your WooCommerce products. This happens
automatically via SKU matching, but you may need to map some products manually.
Automatic Mapping (Happens During Import):
Plugin queries the Google Shopping products API
Matches offerId (Google's product ID) to WooCommerce SKU
Stores mapping in _cirrusly_gmc_product_id post meta
Success rate: ~80-90% if SKUs are consistent
Manual Mapping (For Unmapped Products):
After initial import, if products couldn't be auto-mapped, you'll see an admin notice:
X products could not be automatically mapped. Please review and manually map them.
[Go to Mapping Tool]
Click Go to Mapping Tool or navigate to Cirrusly Commerce > Settings > GMC Product Mapping
You'll see a table with three tabs:
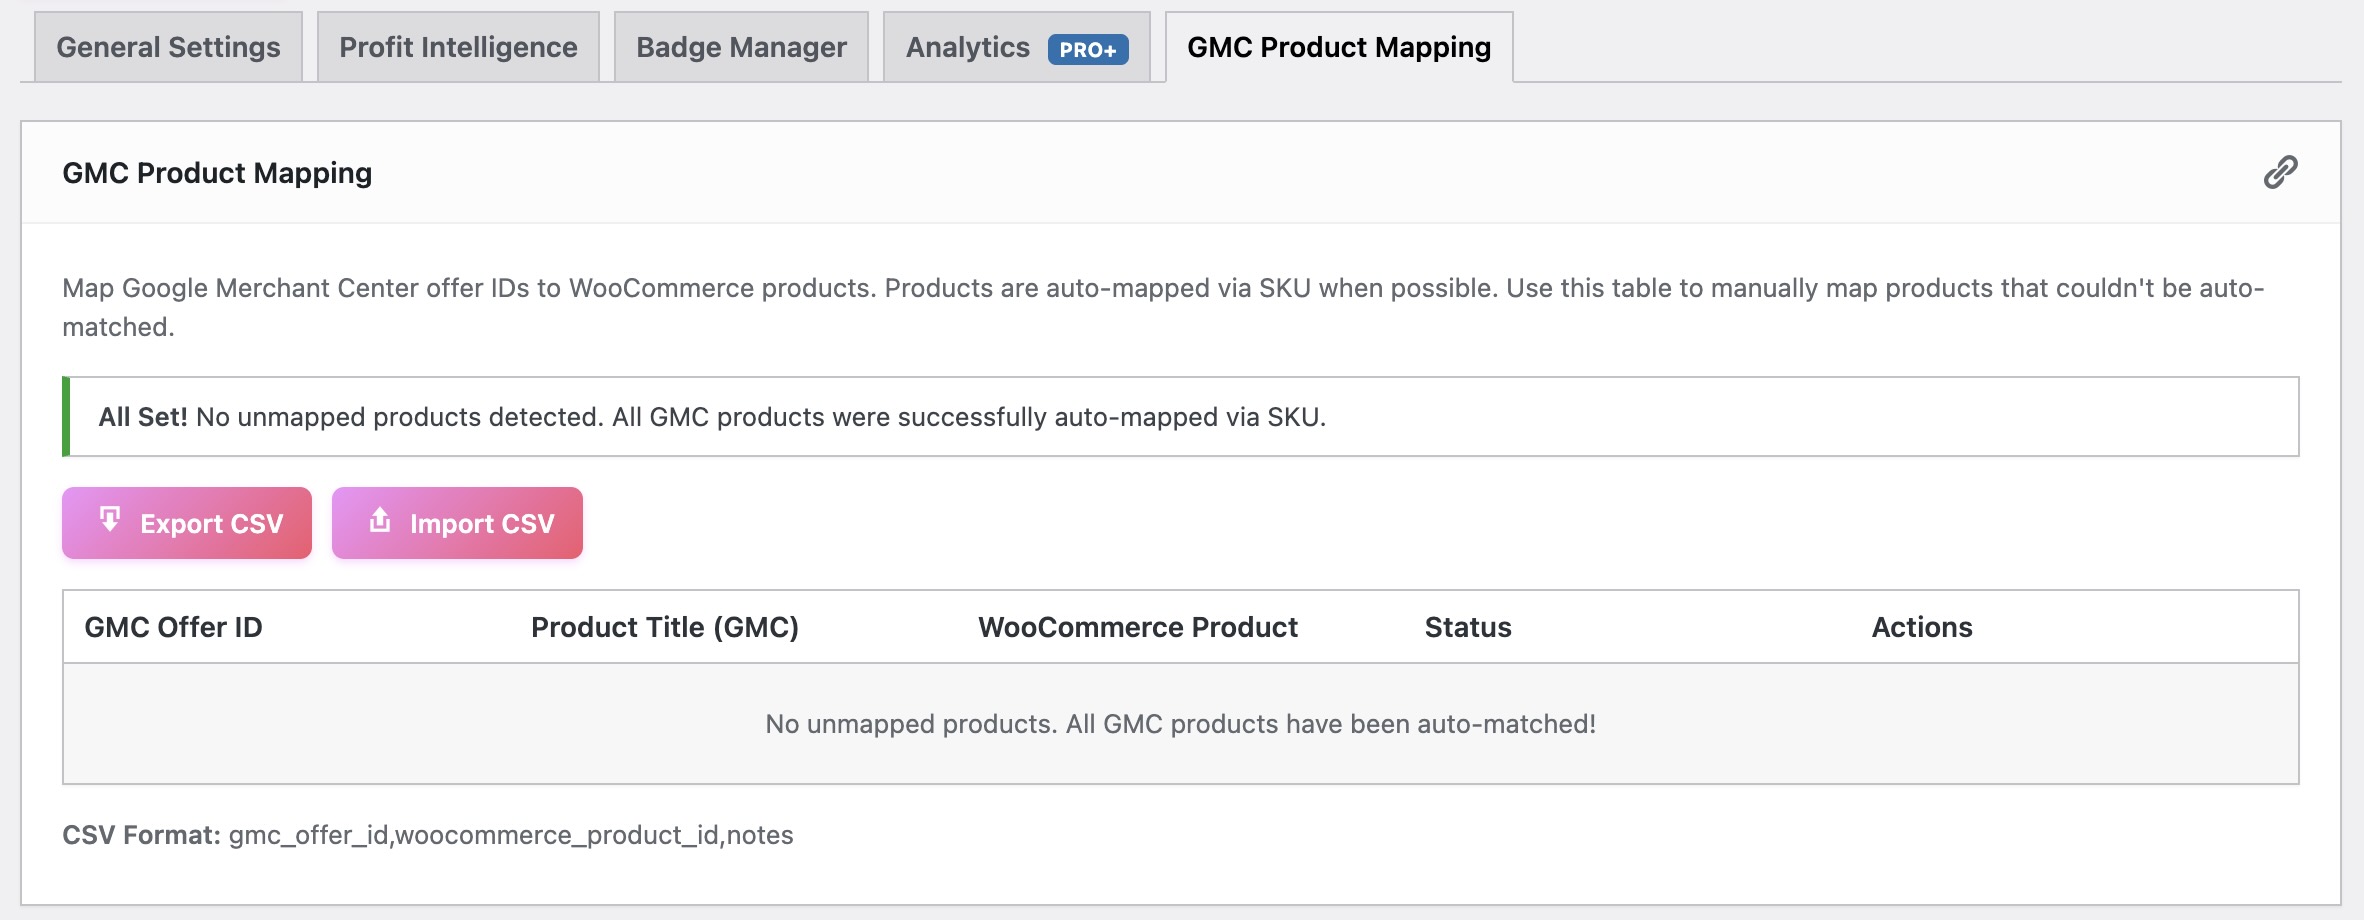
Mapped (X) - Products successfully linked
Unmapped (X) - Products needing manual mapping
All (X) - Full list
For each unmapped product:
Find the row with the Google Shopping product ID
Click the Map Product dropdown
Search for the matching WooCommerce product by name/SKU
Select the product
Mapping is saved automatically (green checkmark appears)
Bulk Actions: Select multiple rows and click Auto-Map Selected by SKU to attempt batch mapping
Export/Import CSV: Click Export Mappings to download CSV, edit offline, then Import Mappings to re-upload
Daily Automatic Sync
After the initial import completes, GMC Analytics runs a daily sync at 2:00 AM server time (via WordPress cron).
What Gets Synced Daily:
Yesterday's Performance Data: Impressions, clicks, CTR, conversions for all mapped
products
Price Competitiveness Data: Checks if your prices are flagged as "too_high" vs.
competitors
Product Status Updates: Detects if products are disapproved, out of stock, or paused
Data Retention:
Transients: Stored for 30 days (rolling window)
Weekly Archives: Aggregated every 7 days, stored for 90 days
Historical Cleanup: Data older than 90 days is automatically deleted
Manual Re-Sync:
If you need to force a sync outside the daily schedule:
- Go to Cirrusly Commerce > Analytics
- Find the GMC Analytics widget
- Click the 🔄 (refresh) icon in the top-right corner
- Sync runs immediately (takes 30-60 seconds)
Understanding the Analytics Dashboard
1. GMC Performance Stat Cards
Four cards at the top of the Analytics page show 7-day aggregated metrics:

2. Traffic Funnel Chart
Visual funnel showing conversion drop-off at each stage:
Impressions: 12,450 (100%)
Clicks: 1,234 (9.91%)
Add to Cart: 234 (18.96% of clicks)
Orders: 87 (37.18% of add to cart)
Hover over each funnel section to see exact counts and percentages.
3. Price Competitiveness Alert
If Google flags your prices as "too high" compared to competitors, you'll see:
X products flagged as "too_high" by Google. Consider adjusting pricing to remain competitive.
[View Affected Products]
Click View Affected Products to see a list of suggested price adjustments based on competitor benchmarks.
4. Top GMC Products Table
Sortable table showing your best-performing products:
| Product | Impressions (7d) | Clicks (7d) | CTR | Conversions | Status |
|---|---|---|---|---|---|
| Premium Wireless Mouse | 2,450 | 234 | 9.55% | 23 | Active |
| Ergonomic Keyboard | 1,890 | 178 | 9.42% | 18 | Price: Too High |
Click column headers to sort. Click the product name to view detailed analytics.
Troubleshooting GMC Analytics
| Issue | Cause | Solution |
|---|---|---|
| "Import failed - API error." | Service account lacks permissions, or APIs are not enabled | Run Product Studio validation (Setup Wizard Step 2) |
| "No products found in GMC" | Products not yet submitted to Google Shopping | Submit feed or use Content API to push products first |
| "All products showing zero impressions" | Products not approved or recently submitted (data not yet available) | Wait 24-48 hours for Google to process and show data |
| "Daily sync not running." | WordPress cron is turned off or failing | Check cron status in System Info (Cirrusly Commerce > System Info) |
| "Quota exceeded during import." | Too many API calls in 24 hours | Wait for quota reset at midnight, or upgrade to Pro Plus for higher limits |
API Cost for GMC Analytics
Initial Import: ~18 API calls (9 batches × 2 calls per batch)
Daily Sync: 2-4 API calls per day
Estimated Monthly Cost: $0.10 - $0.50 (within Google's free tier for most stores)
GMC Analytics is designed to be cost-efficient, using minimal API quota.
Future Enhancements (Roadmap)
- Category Filtering: Filter analytics by product category
- Date Range Selector: Custom date ranges for charts
- AI-Powered Insights: "Your top product lost 20% traffic this week."
- Automated Pricing Rules: Auto-adjust when flagged as "too_high."
- Multi-Store Aggregation: Compare performance across multiple stores
Badge Manager
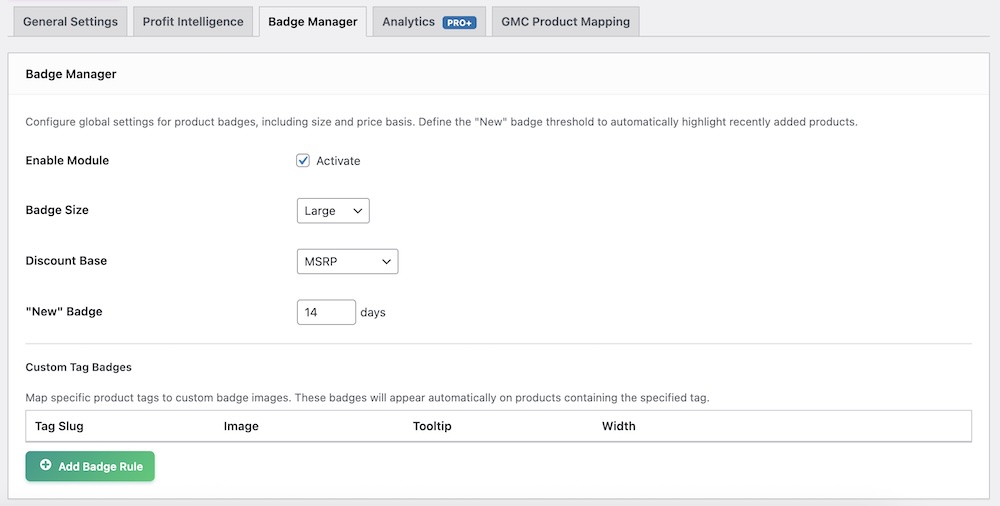
If you completed the Setup Wizard, you likely configured the basics, but the Badge Manager allows for granular control over how visual cues appear on your storefront.
To access these settings, navigate to Cirrusly Commerce > Settings and click the Badge Manager tab.
Global Settings
These settings control the default behavior of badges across your entire store.
Enable Module: Check this box to activate the badging system.
Badge Size: Choose between Small, Medium, or Large to fit your theme's design.
Discount Base: Select how the "Sale" percentage is calculated:
MSRP: Calculates savings based on the Manufacturer's Suggested Retail Price (e.g., "$50 Off MSRP").
Regular Price: Calculates savings based on your store's regular price.

"New" Badge: Enter the number of days a product is considered "New". Products added within this window will automatically display a "New Arrival" badge.
Custom Tag Badges
You can map specific Product Tags to custom images. This is perfect for flags such as "Vegan," "Made in USA," or "Staff Pick" without requiring a separate plugin.
Tag Slug: Enter the exact slug of the product tag (e.g., staff-pick).
Image: Paste the URL of your badge image or click Upload to choose one from your media library.
Tooltip: (Optional) Enter text that appears when a customer hovers over the badge.
Width: Set the display width in pixels (default is 60px).
Smart Badges (Pro)
Pro and Pro Plus users have access to intelligent badges that react to live store data.
Low Stock: Automatically displays a warning badge when inventory drops below five units to create urgency.
Best Seller: Highlights your top-performing products automatically.
Scheduler: Allows you to schedule an "Event" badge (like "Black Friday" or "Summer Sale") to appear on all products between specific start and end dates.
The Pricing Engine and Pricing Intelligence
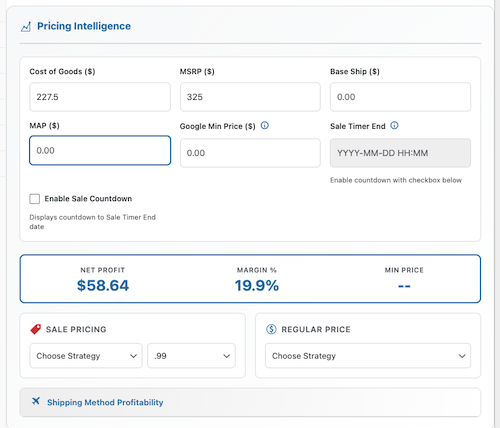
The Pricing Engine is a key feature of Cirrusly Commerce that lets you calculate real-time profit margins while editing products. We’ve placed the custom fields created by the plugin in the General tab, where you enter a product's pricing information.
To use Pricing Intelligence:
- Open any Product (Simple or Variable).
- Locate the custom fields in the General tab (or inside Variations):
- Google Min Price ($): The lowest price you are willing to accept for this product. This is required if you use Google's Automated Discounts feature, which ensures the dynamic price never falls below your profitability threshold.
- MAP ($): Minimum Advertised Price (for reference).
- MSRP ($): Manufacturer’s Suggested Retail Price.
- Base Ship ($): Auto-filled based on the Shipping Class you select, but can be manually overridden.
- Sale Timer End: Enter a date and time (format: YYYY-MM-DD HH:MM) to schedule the end of a sale. This field powers the Sale Countdown block on the frontend.
Note: The Cost of Goods (standard WooCommerce field) and Base Ship fields are necessary at a minimum for the plugin's margin calculations to work.
Regular Price Strategy
We’ve enabled several methods to quickly auto-calculate a regular price based on your needs. Select an option from the Reg. Price Strategy dropdown:
- From MSRP: Match MSRP or 5% below MSRP.
- From Cost: Automatically set the price to achieve a Target Margin of 15%, 20%, or 30%.
Sale Discount
Like the Regular Price Strategy, the Sale Pricing Strategy dropdown lets you automatically calculate a sale price:
- Off MSRP: 5%, 10%, 15%, 20%, 25%, 30%, or 40% off.
- Off Regular: 5%, 10%, or 20% off the current regular price.
Rounding Rules
Before applying a strategy, select a rounding preference to ensure the price looks professional:
- .99: Rounds to the nearest 99 cents (e.g., 19.99).
- .50: Rounds to the nearest 50 cents.
- Nearest 5/0: Rounds to the nearest whole 5 or 0 (e.g., 25.00, 30.00).
- Exact: No rounding.
The Live Profit Display
The Pricing Engine calculates profit, margin, and net earnings in real time. As you type, the values next to Profit and Margin will update instantly, allowing you to fine-tune the price to maximize profit.
Product List View
In addition to the product editor, Cirrusly Commerce adds a Margin column to your main Products > All Products list. This gives you a quick visual indicator of product health:
- Green: Healthy margin (15% or higher).
- Red: Low margin (below 15%).
Using the Enhancement Modal
The next two section discuss Cirrusly Commerce's AI-enhanced functionality. The AI enhancement workflow is consistent across all features:
- Trigger: Click the "Fix with AI" button on any compliance issue or product
- Modal Opens: Shows current content vs. AI-generated preview side-by-side
- Style Selector: Click different style chips at the top to regenerate content instantly
- Live Preview: Content updates in real-time as you switch styles
- Edit Option: Textarea allows manual tweaking before applying
- Character Counter: (Titles only) Live count with color coding:
- Green: Under 130 characters (optimal)
- Yellow: 130-149 characters (warning)
- Red: 150+ characters (error, blocks save)
- Apply: Click "Apply Changes" to save to the product
- Success: Green notice confirms update, modal closes
You can regenerate content unlimited times by switching between styles. Experiment to find the perfect fit for each product!
AI Image Enhancement Modes
Product Studio offers seven image enhancement modes across three cost tiers. When you click Fix with AI on an image issue, you'll see a modal with these options:
🟢 FREE Tier (No API Costs)
These modes use the PHP GD library on your server - no Google API calls:
| Mode | Description | Best For | Your Cost |
|---|---|---|---|
| 📷 Blur Background | Keeps product sharp, blurs everything else | Drawing focus to the product, artistic effect | FREE |
| 🎨 Color Background | Solid color background (choose any hex color) | Brand consistency, matching store theme | FREE |
| 🌈 Gradient Background | Two-color gradient (select start/end colors) | Modern aesthetic, visual interest | FREE |
🔵 Basic Tier (~$0.02 per image)
These modes use Google Vision API + Vertex AI Imagen:
| Mode | Description | Best For | Your Cost |
|---|---|---|---|
| 🖼️ Remove Background | Complete background removal (transparent/white) | Product isolation, clean catalog look | ~$0.02 |
| ⚪ White Background | Clean white studio background | E-commerce standard, Google Shopping | ~$0.02 |
| ✨ Generate New Image | Create product image from scratch using AI | Missing images, placeholder replacements | ~$0.02 |
🟡 Advanced Tier (~$0.04 per image)
This mode uses Google Vision API + Vertex AI Imagen outpainting (scene generation):
| Mode | Description | Best For | Your Cost |
|---|---|---|---|
| 🏞️ AI Scene Background | Generate contextual scenes (e.g., "modern kitchen", "outdoor patio") | Lifestyle imagery, premium product presentation | ~$0.04 |
💡 Cost Optimization Tips
- Start with FREE features - Use blur, color, or gradient backgrounds for 80% of products
- Reserve AI modes for critical products - Use remove/white background for top sellers only
- Google's Free Tier - Vision API: First 1,000 images/month free, Natural Language API: First 5,000 requests/month free
- Typical monthly cost - Most stores: $5-20/month for occasional AI enhancements
How Cost Badges Work in UI
When you open the image enhancement modal, you'll see cost indicators:
- FREE - Green badge, no API cost
- ~$0.02 - Gray badge, basic AI tier
- ~$0.04 - Yellow badge, advanced AI tier
A cost-explanation tooltip appears below the enhancement selector when paid options are available.
Enhance Your Product Descriptions with AI
Product Studio doesn't just generate generic AI content; it offers 19 distinct enhancement variations tailored to different use cases. This is what sets Cirrusly Commerce Pro Plus apart from basic AI plugins.
📝 Product Description Generation (6 Styles)
When you click Generate Description on a product that is missing a long description, choose from:
| Style | Characteristics | Best For |
|---|---|---|
| ✅ Balanced (Default) | Well-rounded, professional tone with features and benefits mixed | General products, standard catalog |
| 👔 Professional | Formal business language, specification-heavy, technical details emphasized | B2B products, industrial equipment, professional services |
| ❤️ Engaging | Story-driven, emotional appeal, lifestyle-focused, relatable scenarios | Consumer goods, gifts, lifestyle products |
| 🔧 Technical | Data-driven, specifications front and center, measurable attributes | Electronics, machinery, tools, scientific equipment |
| 🔍 SEO Optimized | Keyword-rich, search-friendly phrasing, semantic variations included | Competitive niches, organic search traffic priority |
| ⚡ Concise | Brief and punchy, 100-120 words, fast-paced language | Simple products, impulse buys, mobile-first shoppers |
🏷️ Product Title Optimization (5 Strategies)
When you click Optimize Title to ensure GMC compliance, choose from:
| Strategy | Structure | Best For |
|---|---|---|
| ✅ Balanced (Default) | Brand + Product Type + Key Features (under 150 chars) | Standard optimization, most products |
| 🔤 Keyword First | Category/Material + Brand + Specifications (SEO structure) | Competitive search terms, organic traffic priority |
| ⭐ Brand Focus | Brand Name leads, then product type (brand recognition priority) | Strong brands, luxury goods, loyalty-driven purchases |
| 📋 Feature Rich | Packs maximum specifications into 150 characters | Technical products, comparison shoppers |
| 👍 Benefit Driven | Customer value and outcomes emphasized over specs | Solutions-based products, problem-solving items |
Google Shopping Compliance Enforcement: All title strategies automatically:
- Remove promotional terms ("sale", "free shipping", "best price")
- Remove subjective claims ("best", "cheapest", "guaranteed")
- Enforce a 150-character limit
- Strip excessive punctuation and special characters
🖼️ Image Alt Text Enhancement (3 Styles)
When you click Enhance Alt Text to improve accessibility and SEO:
| Style | Characteristics | Best For |
|---|---|---|
| ✅ Standard (Default) | 5-10 word concise descriptions | General use, basic accessibility |
| 👁️ Descriptive | Detailed 10-20 word visual descriptions for screen readers | Accessibility priority, ADA compliance |
| 🔍 SEO Focused | Keyword-rich with product name, brand, and category included | Image search traffic, Google Image results |
Automated Daily Scans
Pro and Pro Plus users can enable daily automated scans with email alerts. Configure in Settings → Automation.
Intelligent Image Resolution System
When Google flags an image quality issue (e.g., "Image quality too low"), Cirrusly Commerce uses an intelligent resolution system to identify the exact problematic image - even if you use a CDN.
How It Works
- Google API Response: Returns image path wrapped in HTML link (e.g.,
<a href="https://cdn.example.com/wp-content/uploads/2024/12/product.jpg">...</a>) - Path Extraction: The Plugin extracts the URL from Google's response
- CDN-Safe Parsing: Strips domain and query parameters, focuses on path:
/wp-content/uploads/2024/12/product.jpg - WordPress Database Lookup: Queries
wp_postmetafor_wp_attached_filematching the path - Attachment ID Resolved: Returns WordPress attachment ID for that specific image
- Modal Pre-Loading: When you click "Fix with AI", the modal opens with the flagged image already loaded
CDN Compatibility
This system works with all major CDN providers because it matches on file path, not domain:
- Cloudflare CDN:
https://cdn.cloudflare.com/...→ resolves to local path - imgix:
https://example.imgix.net/...→ resolves to local path - Cloudinary:
https://res.cloudinary.com/...→ resolves to local path - Jetpack Site Accelerator:
https://i0.wp.com/...→ resolves to local path - Direct WordPress:
https://yoursite.com/wp-content/uploads/...→ resolves to local path
Technical Details
AJAX Endpoint: cirrusly_resolve_image_path
Request:
{
    "image_path": "/wp-content/uploads/2024/12/product.jpg"
}
Response:
{
    "success": true,
    "attachment_id": 12345,
    "attachment_url": "https://yoursite.com/wp-content/uploads/2024/12/product.jpg"
}
Error Handling
If image resolution fails (e.g., image deleted from Media Library), the system gracefully degrades:
- Error Message: "Image not found in Media Library. It may have been deleted or moved."
- Button Revert: "Fix with AI" button returns to original state
- Fallback: User can still manually generate a new image using "Generate New Image" mode
This intelligent system saves merchants significant time by automatically pinpointing the exact image Google flagged, eliminating guesswork.
Automation by Subscription Tier
Cirrusly Commerce offers progressive automation features based on your subscription level. Here's what runs automatically vs. what requires manual action:
| Feature | Free | Pro | Pro Plus |
|---|---|---|---|
| GMC Health Scans | Manual Only | Daily (Automated) | Daily (Automated) |
| Email Scan Reports | — | ✓ Daily | ✓ Daily |
| Block Save on Critical Errors | — | ✓ Optional | ✓ Optional |
| Auto-Strip Banned Words | — | ✓ Optional | ✓ Optional |
| Weekly Profit Reports | — | ||
| Real-Time API Sync | — | ✓ Service Account | ✓ Service Account |
| Instant Disapproval Alerts | — | — | ✓ API-Powered |
| GMC Analytics Daily Sync | — | — | ✓ 2 am Daily |
| AI Content Generation | — | — | Manual (On-Demand) |
| Automated Discounts Sync | — | — | ✓ Real-Time API |
Configuring Automation (Pro/Pro Plus)
Navigate to Cirrusly Commerce > Settings > General Settings and find the "Automation" section:
1. Daily Compliance Reports
- Enable: Check "Send Daily GMC Scan Reports"
- Email: Reports sent to WordPress admin email
- Time: Runs at 2:00 AM server time
- Content: Summary of critical/warning issues found, product count, compliance score
2. Workflow Rules (Compliance Hub)
Navigate to Cirrusly Commerce > Compliance Hub > Health Check and scroll to the "Automation & Workflow Rules" panel:
⚠️ Block Save on Critical Errors
When enabled, WordPress will prevent saving products that contain critical GMC policy violations (e.g., banned words in title/description). User sees a red error notice explaining what must be fixed.
Recommended: Enable this to prevent insufficient data from reaching your product feed.
✅ Auto-Strip Banned Words
When enabled, the plugin automatically removes banned words from titles/descriptions during product save. The user sees a yellow notice listing what was removed.
Recommended: Enable if you frequently copy/paste product data from suppliers (who often include promotional language).
What's NOT Automated (By Design)
Some actions intentionally require manual approval to prevent unintended changes:
- AI Content Application: Always shows preview modal first, requires "Apply Changes" click
- Bulk Price Updates: Pricing Engine requires manual confirmation before changing prices
- Product Deletions: Plugin never deletes products automatically (even if disapproved by Google)
- GMC Data Overwrites: API sync is read-only (reads GMC status, doesn't push unless you explicitly use Content API features)
Philosophy: Automation should save time, not make decisions for you. Critical actions always require human approval.
To configure these settings, navigate to Cirrusly Commerce > Settings.
Automated Health Scans
You don’t need to remember to run a manual scan every time you add products.
- Daily Health Scan: When enabled, the plugin automatically scans your catalog once a day for missing GTINs, prohibited terms, and other compliance issues.
- Email Reports: Opt-in to receive a summary email if the daily scan discovers any new issues so that you can fix them immediately.
Workflow Rules (Pro)
Pro users can enforce data quality at the source—the product editor. These rules prevent "bad data" from ever being saved to your database or reaching your Google Feed.
- Block Save on Critical Error: If you attempt to save or publish a product containing a critical error (like a medical claim in the title), the plugin will block the save and revert the product to "Draft" status until the issue is fixed.
- Auto-strip Banned Words: When enabled, the plugin automatically removes known banned words (e.g., "cure," "guaranteed") from product titles and descriptions the moment you hit save.
Alerts & Notifications (Pro)
Stay informed without constantly logging into your dashboard.
- Weekly Profit Reports: Receive a weekly email summarizing your store's financial health, including total revenue, orders, and estimated net profit.
- Instant Disapproval Alerts: If you have connected the Content API, the plugin can notify you immediately if Google disapproves a product, allowing you to react faster than waiting for a Merchant Center email.
Automated Discounts (Pro Plus)
For high-volume stores, Cirrusly Commerce integrates with Google's Automated Discounts program.
- Dynamic Pricing: This feature allows Google to dynamically lower your product price in Shopping ads to win the auction, while ensuring the price never drops below your profitability threshold.
- Configuration: You must define a Cost of Goods and a Google Min Price for every eligible product.
- Cart Synchronization: When a customer clicks a discounted ad, Cirrusly Commerce validates the secure token from Google and automatically applies the discount to their cart, ensuring the price shown in the ad matches the price at checkout.
Settings Reference

Use these meta keys to map data in feed plugins (like Product Feed Pro, CTX Feed, or Ademti Google Product Feed). All fields are stored as WordPress post meta.
💰 Financial Fields
| Field Name | Meta Key | Description |
|---|---|---|
| Cost of Goods Sold (COGS) | _wc_cog_cost | Native WooCommerce COGS field (must be enabled in WooCommerce settings) |
| MSRP (List Price) | _msrp | Manufacturer's Suggested Retail Price |
| MAP (Minimum Advertised Price) | _cirrusly_map_price | The lowest price you're allowed to advertise publicly |
| Google Min Price | _cirrusly_google_min_price | Floor price for automated discounts (Pro Plus) |
| Base Shipping Cost | _cirrusly_profit_engine_base_ship | Internal cost to ship this product (auto-populated from shipping class) |
📅 Marketing & Urgency Fields
| Field Name | Meta Key | Description |
|---|---|---|
| Sale Timer End Date | _cirrusly_sale_timer | Unix timestamp for countdown timer (used by Sale Countdown block) |
| New Arrival Badge | _cirrusly_show_new_badge | Boolean (yes/no) - manually override "New Arrival" badge display |
| Best Seller Badge | _cirrusly_is_best_seller | Boolean (yes/no) - manually mark as best seller (Pro feature) |
🛒 Google Merchant Center Fields
| Field Name | Meta Key | Description |
|---|---|---|
| GLA Identifier Exists | _gla_identifier_exists | Flag indicating product has valid GTIN/MPN/Brand (Pro feature, set by API scan) |
| GMC Promotion ID | _gmc_promotion_id | Google Merchant Center promotion ID (Pro Plus, Promotion Manager feature) |
| Last GMC Scan Result | _cirrusly_last_scan_issues | JSON array of issues found during the last GMC health scan |
| GMC Scan Timestamp | _cirrusly_last_scan_time | Unix timestamp of last scan (used to show "Last scanned X hours ago") |
📊 Analytics & Tracking (Pro Plus)
| Field Name | Meta Key | Description |
|---|---|---|
| GMC Product ID Mapping | _cirrusly_gmc_product_id |
Google Shopping product ID for analytics mapping |
| GMC Impressions (7-day) | _cirrusly_gmc_impressions_7d |
Cached impression count from GMC Analytics |
| GMC Clicks (7-day) | _cirrusly_gmc_clicks_7d |
Cached click count from GMC Analytics |
| GMC CTR (7-day) | _cirrusly_gmc_ctr_7d |
Click-through rate from GMC Analytics |
🤖 Product Studio AI Fields (Pro Plus)
| Field Name | Meta Key | Description |
|---|---|---|
| AI Description Style Used | _cirrusly_ps_desc_style |
Last AI style used for description (balanced, professional, engaging, etc.) |
| AI Title Strategy Used | _cirrusly_ps_title_strategy |
Last AI strategy used for title (keyword_first, brand_focus, etc.) |
| AI Content Generation Timestamp | _cirrusly_ps_last_generated |
Unix timestamp of last AI content generation |
| AI Image Enhancement Mode | _cirrusly_ps_image_mode |
Last enhancement mode used (blur_bg, remove_bg, scene_bg, etc.) |
⚙️ Internal System Fields
| Field Name | Meta Key | Description |
|---|---|---|
| Profit Engine Cache | _cirrusly_profit_cache |
Serialized array of pre-calculated profit/margin values |
| Badge Display Override | _cirrusly_badge_override |
Manual badge visibility control (overrides automatic logic) |
| Workflow Rule Bypass | _cirrusly_workflow_bypass |
Temporary flag to bypass "block save" rules (admin override) |
💡 Usage Example: Feed Plugin Mapping
Scenario: Mapping MSRP to Google Shopping "price" attribute in Product Feed Pro (AdTribes)
- Open Product Feed Pro feed configuration
- Navigate to the "Field Mapping" section
- Find the Google Shopping attribute
g:price - In the "Value" dropdown, select "Custom Field."
- Enter meta key:
_msrp - Save feed configuration
Result: Feed now pulls the MSRP value instead of the WooCommerce regular price.
🔍 Querying Meta Keys via Code
Developers can access these values programmatically:
// Get MSRP for product ID 123
$msrp = get_post_meta( 123, '_msrp', true );

// Get all GMC scan issues for product
$issues = get_post_meta( 123, '_cirrusly_last_scan_issues', true );
$issues_array = json_decode( $issues, true );

// Check if product is marked as best seller
$is_best_seller = get_post_meta( 123, '_cirrusly_is_best_seller', true );

// Get AI-generated description style used
$ai_style = get_post_meta( 123, '_cirrusly_ps_desc_style', true );
Note: All meta keys prefixed with _ are "private" (hidden from
Custom Fields UI). Use get_post_meta() or the feed plugin custom field mapping to access
them.
How Third-Party Plugin Compatibility Works
Cirrusly Commerce is designed to work alongside your existing WooCommerce plugins, not replace them. Here's how compatibility is achieved and what happens when conflicts arise.
Compatibility Strategy: Shared Meta Keys
Instead of creating proprietary data silos, Cirrusly Commerce uses shared WordPress meta keys that other plugins can read from and write to. This ensures data flows seamlessly between plugins.
Cost of Goods Sold (COGS) - Detection & Fallback
COGS is critical for profit calculations. Cirrusly Commerce supports multiple sources:
| Plugin/Method | Meta Key Used | Priority |
|---|---|---|
| Native WooCommerce COGS (WC 9.4+) | _wc_cog_cost |
1st (Highest Priority) |
| WooCommerce Cost of Goods (SkyVerge) | _wc_cog_cost |
1st (Same as native) |
| WooCommerce Cost of Goods (WPFactory) | _alg_wc_cog_cost |
2nd (Fallback) |
| Manual Entry (Cirrusly's UI) | _cirrusly_manual_cogs |
3rd (Last Resort) |
Auto-Detection Logic:
- Plugin checks if the native WooCommerce COGS feature is enabled
- If enabled, reads from
_wc_cog_cost - If not found, checks for WPFactory's
_alg_wc_cog_cost - If still not found, uses Cirrusly's manual entry field
- If all sources return empty, assumes COGS = $0 (displays warning in Pricing Intelligence)
Product Feed Plugins - Meta Key Sharing
Feed plugins (like Product Feed Pro or CTX Feed) need to read MSRP, MAP, and other custom fields. Cirrusly Commerce uses standard meta keys for easy mapping:
| Cirrusly Field | Meta Key | How Feed Plugins Access It |
|---|---|---|
| MSRP (List Price) | _msrp |
Custom Field mapping: _msrp |
| MAP (Min Advertised Price) | _cirrusly_map_price |
Custom Field mapping: _cirrusly_map_price |
| Google Min Price | _cirrusly_google_min_price |
Custom Field mapping: _cirrusly_google_min_price |
| GTIN/UPC/EAN | _wpm_gtin |
Auto-detected by most feed plugins (standard key) |
Example: Mapping MSRP in Product Feed Pro
- Open your feed configuration in Product Feed Pro
- Find the Google Shopping attribute:
g:sale_price - Change "Value" dropdown to "Custom Field."
- Enter:
_msrp - Save feed - MSRP values now exported to Google Shopping
SEO Plugins - Schema Injection
Cirrusly Commerce automatically injects MSRP into structured data (schema.org JSON-LD) if an SEO plugin is detected:
| SEO Plugin | How Integration Works |
|---|---|
| Rank Math SEO | Hooks into rank_math/json_ld filter, adds
"priceSpecification" array with MSRP
|
| Yoast SEO | Hooks into the wpseo_schema_product filter, adds
"offers" with list price
|
| All in One SEO (AIOSEO) | Hooks into aioseo_schema_output filter, merges MSRP
into product schema |
| SEOPress | Hooks into seopress_schemas_product_output filter,
appends price details |
What Gets Injected:
{
  "@type": "Product",
  "offers": {
    "@type": "Offer",
    "price": "29.99",
    "priceSpecification": {
      "@type": "UnitPriceSpecification",
      "price": "29.99",
      "priceType": "SalePrice"
    },
    "listPrice": "39.99"  ← MSRP injected here
  }
}
Auto-Detection: Plugin checks if function_exists('rank_math'); or
class_exists('WPSEO_Options'); to determine which SEO plugin is active. If none are
detected, schema injection is skipped (no errors thrown).
Known Conflicts & Solutions
| Plugin | Conflict | Cirrusly's Solution |
|---|---|---|
| ATUM Inventory Management | Stores COGS in a separate database
(atum_product_data table) |
⚠️ Not Compatible - Cirrusly cannot read from ATUM's database. Use native WooCommerce COGS instead. |
| WooCommerce Bookings | Bookable products have no regular price (uses booking pricing) | Profit calculations skipped for bookable products (displays "—" in dashboard) |
| WooCommerce Subscriptions | Subscription products have recurring prices | Profit Engine uses the _subscription_price meta key
for calculations |
| Currency Switcher Plugins | Multi-currency prices are stored separately | Profit calculations use base currency only (conversion not supported) |
Octolize Flexible Shipping - Base Cost Integration
Cirrusly Commerce integrates with Flexible Shipping to auto-populate base shipping costs:
- Detects if the Flexible Shipping plugin is active
(
class_exists('WPDesk_Flexible_Shipping')) - Reads shipping class costs from Flexible Shipping's configuration
- Populates
_cirrusly_profit_engine_base_shipmeta key on product save - If Flexible Shipping is not detected, it allows manual entry in the Profit Engine settings
Testing Compatibility with New Plugins
If you install a new plugin and want to test compatibility:
- Enable WP_DEBUG in
wp-config.php:define('WP_DEBUG', true); - Navigate to Cirrusly Commerce > System Info
- Scroll to the "Active Plugins" section
- Look for compatibility warnings (highlighted in yellow)
- If conflicts are detected:
- Check error log:
/wp-content/debug.log - Search for
[Cirrusly Commerce]entries - Submit a support ticket with the error log attached
- Check error log:
Best Practices for Multi-Plugin Setups
- Avoid duplicate COGS plugins - Use either native WooCommerce COGS OR a third-party plugin, not both
- Test feed mapping once - After mapping custom fields, export a sample feed to verify data
- Keep plugins updated - Cirrusly Commerce hooks into standard WooCommerce actions; outdated plugins may break compatibility
- Disable unused features - If not using GMC Analytics, don't run initial import (saves API quota)
Reporting Incompatibilities
If you discover a plugin that conflicts with Cirrusly Commerce:
- Navigate to Cirrusly Commerce > System Info
- Click the "Copy System Info" button at the bottom
- Submit a support ticket with:
- Conflicting plugin name and version
- Specific error message or unexpected behavior
- System Info (pasted from clipboard)
Cirrusly Commerce aims to be a "good neighbor" in the WordPress ecosystem. We use shared standards and hooks to minimize conflicts, but some plugins use proprietary architectures that prevent integration.
Troubleshooting
Why are all the customization options so basic?
We’ve kept the options simple for one big reason: performance. When a developer adds heavy customization, the codebase also grows. Whether you use these features or not, that code needs to be loaded. By limiting the customization, we’re keeping the plugin (and your site) fast.
Why can't I save my product?
If you click "Update" or "Publish" and the page reloads with the status set back to "Draft," you likely have the Block Save on Critical Error setting enabled.
- The Cause: Your product title or description contains a restricted term (e.g., "cure," "covid") that triggers a Critical Health Check error.
- The Fix: Remove the restricted term or turn off the blocking feature in Cirrusly Commerce > Compliance Hub.
My API Sync Status is "Inactive"
This status appears in the Dashboard if the Real-Time API is not connected.
- Pro Users: You must generate a Google Service Account Key and upload the JSON file in Settings > General > Content API.
- Free Users: This feature is not available. Your feed will update according to your Google Merchant Center fetch schedule (usually once every 24 hours).
I don't see my profit margins.
If the margin columns show "--" or are missing:
- Ensure you have entered the product's Cost of Goods.
- Verify that the native WooCommerce COGS feature is enabled. Go to WooCommerce > Settings > Advanced and check the "Allows entering cost of goods sold information" option.
Does this plugin add the MSRP to my Google Feed?
The plugin adds the data to your products (saved as _alg_msrp), but you need a feed plugin (like
Product Feed PRO) to map this field to the g:price or g:sale_price attributes in your feed. We add
our fields to their dropdowns automatically for easy mapping.
Why isn't the MSRP showing on my product page?
Check Cirrusly Commerce > Settings > General to ensure "MSRP Price: Show
Strikethrough" is checked. If you are using a Block Theme (FSE), we recommend using the
"MSRP Display" block in the Site Editor.
How do I upgrade to Pro?
You can upgrade directly from within the plugin. Click the GoPro link in the Cirrusly Commerce menu
or navigate to Cirrusly Commerce > Account to enter your license key.